 |
am3zzw00001597
FUEL-FILLER SWITCH INSPECTION[MZ-CD 1.6 (Y6)]
id0140b2805900
Visual Inspection
1. Remove the fuel-filler switch. (See FUEL-FILLER SWITCH REMOVAL/INSTALLATION[MZ-CD 1.6 (Y6)].)
2. Verify that there are no metal shavings on the sensor.
3. Visually inspect the fuel-filler switch for the following:
4. Install the fuel-filler switch. (See FUEL-FILLER SWITCH REMOVAL/INSTALLATION[MZ-CD 1.6 (Y6)].)
Continuity Inspection
1. Remove the fuel-filler switch. (See FUEL-FILLER SWITCH REMOVAL/INSTALLATION[MZ-CD 1.6 (Y6)].)
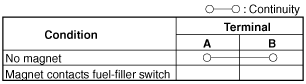
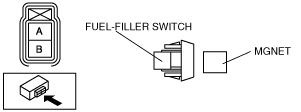
2. Verify that the continuity between fuel-filler switch terminals A and B is as indicated in the table.
am3zzw00001597
|
am3zzw00001598
|
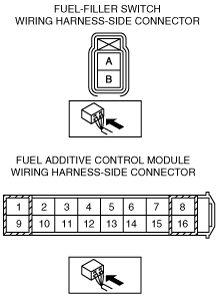
Circuit Open/Short Inspection
1. Remove the rear seat cushion.
2. Disconnect the fuel additive control module connector. (See FUEL ADDITIVE CONTROL MODULE REMOVAL/INSTALLATION[MZ-CD 1.6 (Y6)].)
3. Inspect the following wiring harness for open or short circuit (continuity check).
am3zzw00001599
|
Open circuit
Short circuit