 |
am3zzw00001532
FUEL ADDITIVE TANK REMOVAL/INSTALLATION [MZ-CD 1.6 (Y6)]
id0116c3805300
1. Remove the battery cover. (See BATTERY REMOVAL/INSTALLATION [MZ-CD 1.6 (Y6)].)
2. Disconnect the negative battery cable.
3. Remove the rear crossmember bracket. (See REAR STABILIZER REMOVAL/INSTALLATION [EXCEPT MZR-CD (RF Turbo)].)
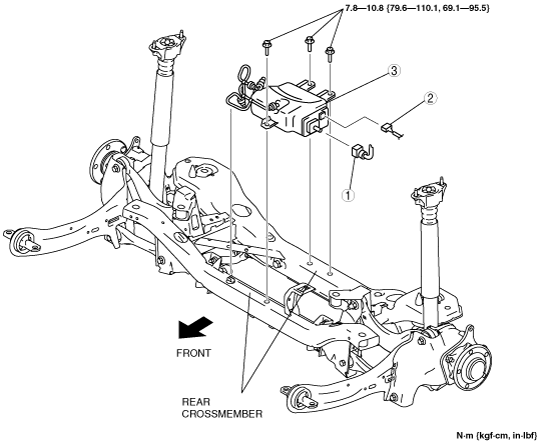
4. Remove in the order indicated in the table.
am3zzw00001532
|
|
1
|
Quick release connector (Type D)
(See QUICK RELEASE CONNECTOR REMOVAL/INSTALLATION [MZ-CD 1.6 (Y6)], Type D Removal.)
(See QUICK RELEASE CONNECTOR REMOVAL/INSTALLATION [MZ-CD 1.6 (Y6)], Type D Installation.)
|
|
2
|
Fuel additive pump unit connector
|
|
3
|
Fuel additive tank
|
5. Install in the reverse order of removal.
6. Refill the fuel additive to the fuel additive tank. (See FUEL ADDITIVE FILLING [MZ-CD 1.6 (Y6)].)
7. Perform the “AFTER REFILL PROCEDURE”. (See AFTER REPAIR PROCEDURE [MZ-CD 1.6 (Y6)].)
8. Perform the “AFTER FUEL ADDITIVE SYSTEM REPAIR PROCEDURE”. (See AFTER FUEL ADDITIVE SYSTEM REPAIR PROCEDURE [MZ-CD 1.6 (Y6)].)
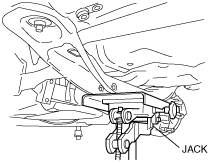
Fuel Additive Tank Removal Note
1. Support the rear crossmember with the jack and remove the bolt.
am3zzw00001533
|
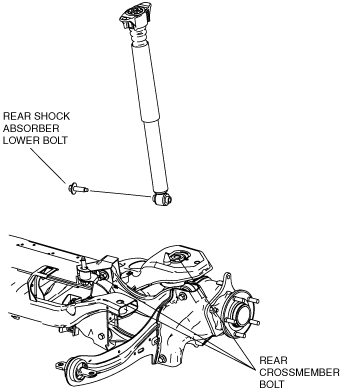
2. Remove the rear crossmember bolts and rear shock absorber lower bolt.
am3zzw00001534
|
3. Lower the jack slowly and ensure a sufficient space to remove the fuel additive tank.